MyBatis-Plus联表查询的短板,终于有一款工具补齐了

  • mybatis-plus作为mybatis的增强工具,它的出现极大地简化了开发中的数据库操作,但是长久以来,它的联表查询能力一直被大家所诟病。一旦遇到left join或right join的左右连接,你还是得老老实实地打开xml文件,手写上一大段的sql语句。

  • 直到前几天,偶然碰到了这么一款叫做mybatis-plus-join的工具(后面就简称mpj了),使用了一下,不得不说真香!彻底将我从xml地狱中解放了出来,终于可以以类似mybatis-plus中QueryWrapper的方式来进行联表查询了,话不多说,我们下面开始体验。

引入依赖

首先在项目中引入引入依赖坐标,因为mpj中依赖较高版本mybatis-plus中的一些api,所以项目建议直接使用高版本。

<dependency>
    <groupId>com.github.yulichang</groupId>
    <artifactId>mybatis-plus-join</artifactId>
    <version>1.2.4</version>
</dependency>
<dependency>
    <groupId>com.baomidou</groupId>
    <artifactId>mybatis-plus-boot-starter</artifactId>
    <version>3.5.1</version>
</dependency>

引入相关依赖后,在springboot项目中,像往常一样正常配置数据源连接信息就可以了。

数据准备

因为要实现联表查询,所以我们先来建几张表进行测试。

订单表:
824d2133203245e4aec8122feb860971.png

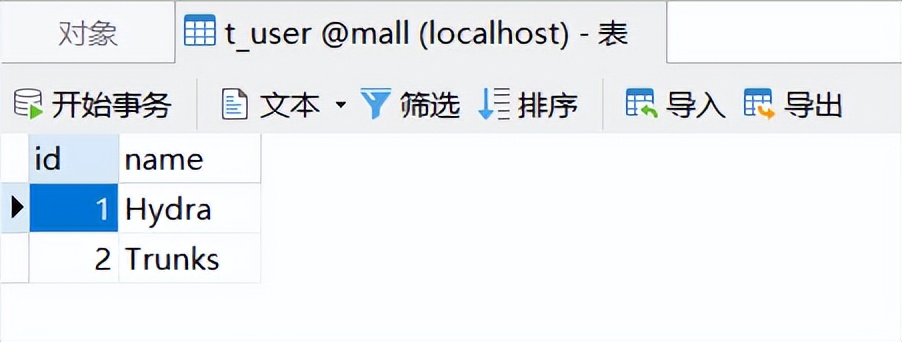
用户表,包含用户姓名:
dde7b546424d49b2855311353db4c3a6.jpg

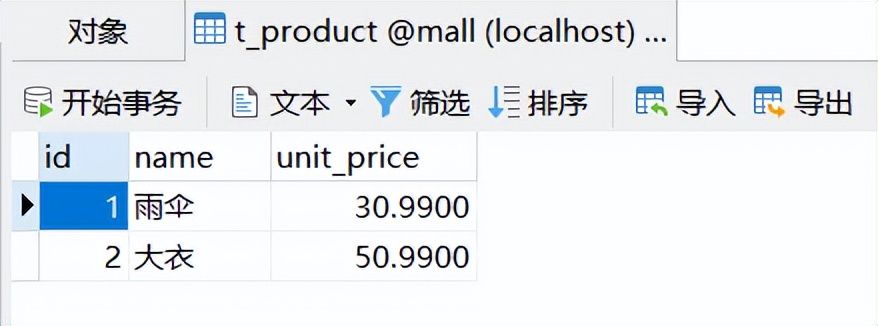
商品表,包含商品名称和单价:
beac53b77c1a466fb307a465210a25af.jpg

在订单表中,通过用户id和商品id与其他两张表进行关联。

修改Mapper

以往在使用myatis-plus的时候,我们的Mapper层接口都是直接继承的BaseMapper,使用mpj后需要对其进行修改,改为继承MPJBaseMapper接口。

@Mapper
public interface OrderMapper extends MPJBaseMapper<Order> {
}

对其余两个表的Mapper接口也进行相同的改造。此外,我们的service也可以选择继承MPJBaseService,serviceImpl选择继承MPJBaseServiceImpl,这两者为非必须继承。

查询

Mapper接口改造完成后,我们把它注入到Service中,虽然说我们要完成3张表的联表查询,但是以Order作为主表的话,那么只注入这一个对应的OrderMapper就可以,非常简单。

@Service
@AllArgsConstructor
public class OrderServiceImpl implements OrderService {
    private final OrderMapper orderMapper;
}

MPJLambdaWrapper

接下来,我们体验一下再也不用写sql的链表查询:

public void getOrder() {
    List<OrderDto> list = orderMapper.selectJoinList(OrderDto.class,
     new MPJLambdaWrapper<Order>()
      .selectAll(Order.class)
      .select(Product::getUnitPrice)
      .selectAs(User::getName,OrderDto::getUserName)
      .selectAs(Product::getName,OrderDto::getProductName)
      .leftJoin(User.class, User::getId, Order::getUserId)
      .leftJoin(Product.class, Product::getId, Order::getProductId)
      .eq(Order::getStatus,3));

    list.forEach(System.out::println);
}

不看代码,我们先调用接口来看一下执行结果:
34b088370b224375ae0f03d1beec49ec.png

可以看到,成功查询出了关联表中的信息,下面我们一点点介绍上面代码的语义。

首先,调用mapper的selectJoinList()方法,进行关联查询,返回多条结果。后面的第一个参数OrderDto.class代表接收返回查询结果的类,作用和我们之前在xml中写的resultType类似。

这个类可以直接继承实体,再添加上需要在关联查询中返回的列表即可:

@Data
@ToString(callSuper = true)
@EqualsAndHashCode(callSuper = true)
public class OrderDto extends Order {
    String userName;
    String productName;
    Double unitPrice;
}

接下来的MPJLambdaWrapper就是构建查询条件的核心了,看一下我们在上面用到的几个方法:

  • selectAll():查询指定实体类的全部字段
  • select():查询指定的字段,支持可变长参数同时查询多个字段,但是在同一个select中只能查询相同表的字段,所以如果查询多张表的字段需要分开写
  • selectAs():字段别名查询,用于数据库字段与接收结果的dto中属性名称不一致时转换
  • leftJoin():左连接,其中第一个参数是参与联表的表对应的实体类,第二个参数是这张表联表的ON字段,第三个参数是参与联表的ON的另一个实体类属性

除此之外,还可以正常调用mybatis-plus中的各种原生方法,文档中还提到,默认主表别名是t,其他的表别名以先后调用的顺序使用t1、t2、t3以此类推。

我们用插件读取日志转化为可读的sql语句,可以看到两条左连接条件都被正确地添加到了sql中:

048bad23630e4e4a9351a527cb7bb5ad.png

MPJQueryWrapper

和mybatis-plus非常类似,除了LamdaWrapper外还提供了普通QueryWrapper的写法,改造上面的代码:

public void getOrderSimple() {
    List<OrderDto> list = orderMapper.selectJoinList(OrderDto.class,
     new MPJQueryWrapper<Order>()
      .selectAll(Order.class)
      .select("t2.unit_price","t2.name as product_name")
      .select("t1.name as user_name")
      .leftJoin("t_user t1 on t1.id = t.user_id")
      .leftJoin("t_product t2 on t2.id = t.product_id")
      .eq("t.status", "3")
    );

    list.forEach(System.out::println);
}

运行结果与之前完全相同,需要注意的是,这样写时在引用表名时不要使用数据库中的原表名,主表默认使用t,其他表使用join语句中我们为它起的别名,如果使用原表名在运行中会出现报错。

并且,在MPJQueryWrapper中,可以更灵活的支持子查询操作,如果业务比较复杂,那么使用这种方式也是不错的选择。

分页查询

mpj中也能很好地支持列表查询中的分页功能,首先我们要在项目中加入分页拦截器:

@Bean
public MybatisPlusInterceptor mybatisPlusInterceptor(){
    MybatisPlusInterceptor interceptor = new MybatisPlusInterceptor();
    interceptor.addInnerInterceptor(new PaginationInnerInterceptor(DbType.H2));
    return interceptor;
}

接下来改造上面的代码,调用selectJoinPage()方法:

public void page() {
    IPage<OrderDto> orderPage = orderMapper.selectJoinPage(
      new Page<OrderDto>(2,10),
      OrderDto.class,
      new MPJLambdaWrapper<Order>()
        .selectAll(Order.class)
        .select(Product::getUnitPrice)
        .selectAs(User::getName, OrderDto::getUserName)
        .selectAs(Product::getName, OrderDto::getProductName)
        .leftJoin(User.class, User::getId, Order::getUserId)
        .leftJoin(Product.class, Product::getId, Order::getProductId)
        .orderByAsc(Order::getId));

    orderPage.getRecords().forEach(System.out::println);
}

注意在这里需要添加一个分页参数的Page对象,我们再执行上面的代码,并对日志进行解析,查看sql语句:

a5cce2c58dd44032b34d75316cf58c23.png

可以看到底层通过添加limit进行了分页,同理,MPJQueryWrapper也可以这样进行分页。

最后

经过简单的测试,个人感觉mpj这款工具在联表查询方面还是比较实用的,能够应对项目中不是非常复杂的场景下的sql查询,大大提高我们的生产效率。当然,在项目的issues中也能看到当前版本中也仍然存在一些问题,希望在后续版本迭代中能继续完善。

Spring Boot踩坑笔记二:SpringBoot整合redis报No qualifying bean of type 'org.springframework.data.redis.core.RedisTemplate<java.lang.String, java.lang.Object>异常

今天在学习Spring Boot整合redis的过程中遇到个问题,在使用注入时,启动项目会报异常

@Autowired
private RedisTemplate<String, Object> redisTemplate;
[2022-07-08 22:56:56,195][DEBUG][main] Application failed to start due to an exception (LoggingFailureAnalysisReporter.java:37)
org.springframework.beans.factory.NoSuchBeanDefinitionException: No qualifying bean of type 'org.springframework.data.redis.core.RedisTemplate<java.lang.String, java.lang.Object>' available: expected at least 1 bean which qualifies as autowire candidate. Dependency annotations: {@org.springframework.beans.factory.annotation.Autowired(required=true)}
    at org.springframework.beans.factory.support.DefaultListableBeanFactory.raiseNoMatchingBeanFound(DefaultListableBeanFactory.java:1801) ~[spring-beans-5.3.21.jar:5.3.21]
    at org.springframework.beans.factory.support.DefaultListableBeanFactory.doResolveDependency(DefaultListableBeanFactory.java:1357) ~[spring-beans-5.3.21.jar:5.3.21]
    at org.springframework.beans.factory.support.DefaultListableBeanFactory.resolveDependency(DefaultListableBeanFactory.java:1311) ~[spring-beans-5.3.21.jar:5.3.21]
    at org.springframework.beans.factory.annotation.AutowiredAnnotationBeanPostProcessor$AutowiredFieldElement.resolveFieldValue(AutowiredAnnotationBeanPostProcessor.java:656) ~[spring-beans-5.3.21.jar:5.3.21]
    at org.springframework.beans.factory.annotation.AutowiredAnnotationBeanPostProcessor$AutowiredFieldElement.inject(AutowiredAnnotationBeanPostProcessor.java:639) ~[spring-beans-5.3.21.jar:5.3.21]
    at org.springframework.beans.factory.annotation.InjectionMetadata.inject(InjectionMetadata.java:119) ~[spring-beans-5.3.21.jar:5.3.21]
    at org.springframework.beans.factory.annotation.AutowiredAnnotationBeanPostProcessor.postProcessProperties(AutowiredAnnotationBeanPostProcessor.java:399) ~[spring-beans-5.3.21.jar:5.3.21]
    at org.springframework.beans.factory.support.AbstractAutowireCapableBeanFactory.populateBean(AbstractAutowireCapableBeanFactory.java:1431) ~[spring-beans-5.3.21.jar:5.3.21]
    at org.springframework.beans.factory.support.AbstractAutowireCapableBeanFactory.doCreateBean(AbstractAutowireCapableBeanFactory.java:619) ~[spring-beans-5.3.21.jar:5.3.21]
    at org.springframework.beans.factory.support.AbstractAutowireCapableBeanFactory.createBean(AbstractAutowireCapableBeanFactory.java:542) ~[spring-beans-5.3.21.jar:5.3.21]
    at org.springframework.beans.factory.support.AbstractBeanFactory.lambda$doGetBean$0(AbstractBeanFactory.java:335) ~[spring-beans-5.3.21.jar:5.3.21]
    at org.springframework.beans.factory.support.DefaultSingletonBeanRegistry.getSingleton(DefaultSingletonBeanRegistry.java:234) ~[spring-beans-5.3.21.jar:5.3.21]
    at org.springframework.beans.factory.support.AbstractBeanFactory.doGetBean(AbstractBeanFactory.java:333) ~[spring-beans-5.3.21.jar:5.3.21]
    at org.springframework.beans.factory.support.AbstractBeanFactory.getBean(AbstractBeanFactory.java:208) ~[spring-beans-5.3.21.jar:5.3.21]
    at org.springframework.beans.factory.config.DependencyDescriptor.resolveCandidate(DependencyDescriptor.java:276) ~[spring-beans-5.3.21.jar:5.3.21]
    at org.springframework.beans.factory.support.DefaultListableBeanFactory.doResolveDependency(DefaultListableBeanFactory.java:1391) ~[spring-beans-5.3.21.jar:5.3.21]
    at org.springframework.beans.factory.support.DefaultListableBeanFactory.resolveDependency(DefaultListableBeanFactory.java:1311) ~[spring-beans-5.3.21.jar:5.3.21]
    at org.springframework.beans.factory.annotation.AutowiredAnnotationBeanPostProcessor$AutowiredFieldElement.resolveFieldValue(AutowiredAnnotationBeanPostProcessor.java:656) ~[spring-beans-5.3.21.jar:5.3.21]
    at org.springframework.beans.factory.annotation.AutowiredAnnotationBeanPostProcessor$AutowiredFieldElement.inject(AutowiredAnnotationBeanPostProcessor.java:639) ~[spring-beans-5.3.21.jar:5.3.21]
    at org.springframework.beans.factory.annotation.InjectionMetadata.inject(InjectionMetadata.java:119) ~[spring-beans-5.3.21.jar:5.3.21]
    at org.springframework.beans.factory.annotation.AutowiredAnnotationBeanPostProcessor.postProcessProperties(AutowiredAnnotationBeanPostProcessor.java:399) ~[spring-beans-5.3.21.jar:5.3.21]
    at org.springframework.beans.factory.support.AbstractAutowireCapableBeanFactory.populateBean(AbstractAutowireCapableBeanFactory.java:1431) ~[spring-beans-5.3.21.jar:5.3.21]
    at org.springframework.beans.factory.support.AbstractAutowireCapableBeanFactory.doCreateBean(AbstractAutowireCapableBeanFactory.java:619) ~[spring-beans-5.3.21.jar:5.3.21]
    at org.springframework.beans.factory.support.AbstractAutowireCapableBeanFactory.createBean(AbstractAutowireCapableBeanFactory.java:542) ~[spring-beans-5.3.21.jar:5.3.21]
    at org.springframework.beans.factory.support.AbstractBeanFactory.lambda$doGetBean$0(AbstractBeanFactory.java:335) ~[spring-beans-5.3.21.jar:5.3.21]
    at org.springframework.beans.factory.support.DefaultSingletonBeanRegistry.getSingleton(DefaultSingletonBeanRegistry.java:234) ~[spring-beans-5.3.21.jar:5.3.21]
    at org.springframework.beans.factory.support.AbstractBeanFactory.doGetBean(AbstractBeanFactory.java:333) ~[spring-beans-5.3.21.jar:5.3.21]
    at org.springframework.beans.factory.support.AbstractBeanFactory.getBean(AbstractBeanFactory.java:208) ~[spring-beans-5.3.21.jar:5.3.21]
    at org.springframework.beans.factory.support.DefaultListableBeanFactory.preInstantiateSingletons(DefaultListableBeanFactory.java:955) ~[spring-beans-5.3.21.jar:5.3.21]
    at org.springframework.context.support.AbstractApplicationContext.finishBeanFactoryInitialization(AbstractApplicationContext.java:918) ~[spring-context-5.3.21.jar:5.3.21]
    at org.springframework.context.support.AbstractApplicationContext.refresh(AbstractApplicationContext.java:583) ~[spring-context-5.3.21.jar:5.3.21]
    at org.springframework.boot.web.servlet.context.ServletWebServerApplicationContext.refresh(ServletWebServerApplicationContext.java:147) ~[spring-boot-2.7.1.jar:2.7.1]
    at org.springframework.boot.SpringApplication.refresh(SpringApplication.java:734) ~[spring-boot-2.7.1.jar:2.7.1]
    at org.springframework.boot.SpringApplication.refreshContext(SpringApplication.java:408) ~[spring-boot-2.7.1.jar:2.7.1]
    at org.springframework.boot.SpringApplication.run(SpringApplication.java:308) ~[spring-boot-2.7.1.jar:2.7.1]
    at org.springframework.boot.SpringApplication.run(SpringApplication.java:1306) ~[spring-boot-2.7.1.jar:2.7.1]
    at org.springframework.boot.SpringApplication.run(SpringApplication.java:1295) ~[spring-boot-2.7.1.jar:2.7.1]
    at com.recallg.huobitask.HuoBiTaskApplication.main(HuoBiTaskApplication.java:14) ~[classes/:?]
[2022-07-08 22:56:56,198][ERROR][main] 

***************************
APPLICATION FAILED TO START
***************************

Description:

Field redisTemplate in com.recallg.huobitask.service.cache.impl.RedisServiceImpl required a bean of type 'org.springframework.data.redis.core.RedisTemplate' that could not be found.

The injection point has the following annotations:
    - @org.springframework.beans.factory.annotation.Autowired(required=true)


Action:

Consider defining a bean of type 'org.springframework.data.redis.core.RedisTemplate' in your configuration.
 (LoggingFailureAnalysisReporter.java:40)

Process finished with exit code 1

这么一大串看的是不是有点懵,其实咱们看一句可以了

org.springframework.beans.factory.NoSuchBeanDefinitionException: No qualifying bean of type 'org.springframework.data.redis.core.RedisTemplate<java.lang.String, java.lang.Object>' available: expected at least 1 bean which qualifies as autowire candidate

大致意思是没有与RedisTemplate<String, Object>匹配的bean

解决方法

1、不指定泛型,如

@Autowired
private RedisTemplate redisTemplate;

2、使用@Resource注解代替@Autowired,如

@Resource
private RedisTemplate<String, Object> redisTemplate;

centos 使用iptables实现只允许中国IP访问服务器或者禁止访问

安装ipset

#Debian/Ubuntu系统
apt-get -y install ipset

#CentOS系统
yum -y install ipset

CentOS 7还需要关闭firewall防火墙:

systemctl stop firewalld.service
systemctl disable firewalld.service

清空之前的规则

防止设置不生效,建议清空下之前的防火墙规则
iptables -P INPUT ACCEPT
iptables -F

创建新规则

#创建一个名为cnip的规则
ipset -N cnip hash:net
#下载国家IP段,这里以中国为例
wget -P . http://www.ipdeny.com/ipblocks/data/countries/cn.zone
#将IP段添加到cnip规则中
for i in $(cat /root/cn.zone ); do ipset -A cnip $i; done

设置IP段白名单

#放行IP段
iptables -A INPUT -p tcp -m set --match-set cnip src -j ACCEPT
#关掉所有端口
iptables -P INPUT DROP

这时候就只有中国的IP能访问服务器了。

禁止规则内的ip访问

iptables -A INPUT -p tcp -m set --match-set cnip src -j DROP

每个国家的IP段汇总

https://www.ipdeny.com/ipblocks/

Java 中节省 90% 时间的常用的工具类

前言

你们有木有喜欢看代码的领导啊,我的领导就喜欢看我写的代码,有事没事就喜欢跟我探讨怎么写才最好,哈哈哈...挺好。
今天我们就一起来看看可以节省 90% 的加班时间的第三方开源库吧,第一个介绍的必须是 Apache 下的 Commons 库。第二个是 google 开源的 Guava 库。

Apache Commons

Apache Commons 是一个功能非常强大、经常被使用到的库。它有 40 个左右的类库,包含了对字符串、日期、数组等的操作。

Lang3

Lang3 是一个处理 Java 中基本对象的包,比如用 StringUtils 类操作字符串、ArrayUtils 类操作数组、DateUtils 类可以处理日期、MutablePair 类可以返回多个字段等等。

包结构:

maven 依赖

<!-- https://mvnrepository.com/artifact/org.apache.commons/commons-lang3 -->
<dependency>
    <groupId>org.apache.commons</groupId>
    <artifactId>commons-lang3</artifactId>
    <version>3.12.0</version>
</dependency>

字符串操作

对字符串快速操作,在 if else 的少写判空条件。

public static void main(String[] args) {
    boolean blank = StringUtils.isBlank(" ");//注意此处是null哦  这和isEmpty不一样的
    System.out.println(blank);

    boolean empty = StringUtils.isEmpty(" ");//注意这里是false
    System.out.println(empty);

    boolean anyBlank = StringUtils.isAnyBlank("a", " ", "c");// 其中一个是不是空字符串
    System.out.println(anyBlank);

    boolean numeric = StringUtils.isNumeric("1");//字符串是不是全是数字组成,"." 不算数字
    System.out.println(numeric);

    String remove = StringUtils.remove("abcdefgh", "a");//移除字符串
    System.out.println(remove);
}

输出结果:

true
false
true
true
bcdefgh

Process finished with exit code 0

日期操作

终于可以不用 SimpleDateFormat 格式化日期了,DateUtils.iterator 可以获取一段时间。

public static void main(String[] args) throws ParseException {

    Date date = DateUtils.parseDate("2021-07-15", "yyyy-MM-dd");

    Date date1 = DateUtils.addDays(date, 1);//加一天
    System.out.println(date1);

    boolean sameDay = DateUtils.isSameDay(date, new Date());//比较
    System.out.println(sameDay);
    /*
        获取一段日期
        RANGE_WEEK_SUNDAY 从周日开始获取一周日期
        RANGE_WEEK_MONDAY 从周一开始获取一周日期
        RANGE_WEEK_RELATIVE 从当前时间开始获取一周日期
        RANGE_WEEK_CENTER 以当前日期为中心获取一周日期
        RANGE_MONTH_SUNDAY 从周日开始获取一个月日期
        RANGE_MONTH_MONDAY 从周一开始获取一个月日期
        */
    Iterator<Calendar> iterator = DateUtils.iterator(date, DateUtils.RANGE_WEEK_CENTER);
    while (iterator.hasNext()) {
        Calendar next = iterator.next();
        System.out.println(DateFormatUtils.format(next, "yyyy-MM-dd"));
    }
}

输出结果:

Fri Jul 16 00:00:00 CST 2021
false
2021-07-12
2021-07-13
2021-07-14
2021-07-15
2021-07-16
2021-07-17
2021-07-18

Process finished with exit code 0

返回多个字段

有时候在一个方法中需要返回多个值的时候,经常会使用 HashMap 返回或者是 JSON 返回。Lang3 下已经帮我们提供了这样的工具类,不需要再多写 HashMap 和 JSON 了。

public static void main(String[] args) {

    MutablePair<Integer, String> mutablePair = MutablePair.of(2, "这是两个值");
    System.out.println(mutablePair.getLeft() + "  " + mutablePair.getRight());

    MutableTriple<Integer, String, Date> mutableTriple = MutableTriple.of(2, "这是三个值", new Date());
    System.out.println(mutableTriple.getLeft() + " " + mutableTriple.getMiddle() + " " + mutableTriple.getRight());
}

输出结果:

2  这是两个值
2 这是三个值 Fri Jul 16 15:24:40 CST 2021

Process finished with exit code 0

ArrayUtils 数组操作

ArrayUtils 是专门处理数组的类,可以让方便的处理数组而不是需要各种循环操作。

public static void main(String[] args) {

    //合并数组
    String[] array1 = new String[]{"value1", "value2"};
    String[] array2 = new String[]{"value3", "value4"};
    String[] array3 = ArrayUtils.addAll(array1, array2);
    System.out.println("array3:"+ArrayUtils.toString(array3));

    //clone 数组
    String[] array4 = ArrayUtils.clone(array3);
    System.out.println("array4:"+ArrayUtils.toString(array4));

    //数组是否相同
    boolean b = EqualsBuilder.reflectionEquals(array3, array4);
    System.out.println(b);

    //反转数组
    ArrayUtils.reverse(array4);
    System.out.println("array4反转后:"+ArrayUtils.toString(array4));

    //二维数组转 map
    Map<String, String> arrayMap = (HashMap) ArrayUtils.toMap(new String[][]{
        {"key1", "value1"}, {"key2", "value2"}
    });
    for (String s : arrayMap.keySet()) {
        System.out.println(arrayMap.get(s));
    }
}

输出结果:

array3:{value1,value2,value3,value4}
array4:{value1,value2,value3,value4}
true
array4反转后:{value4,value3,value2,value1}
value1
value2

Process finished with exit code 0

EnumUtils 枚举操作

  • getEnum(Class enumClass, String enumName) 通过类返回一个枚举,可能返回空;
  • getEnumList(Class enumClass) 通过类返回一个枚举集合;
  • getEnumMap(Class enumClass) 通过类返回一个枚举map;
  • isValidEnum(Class enumClass, String enumName) 验证enumName是否在枚举中,返回true或false。
public enum ImagesTypeEnum {
    JPG,JPEG,PNG,GIF;
}
public static void main(String[] args) {
    ImagesTypeEnum imagesTypeEnum = EnumUtils.getEnum(ImagesTypeEnum.class, "JPG");
    System.out.println("imagesTypeEnum = " + imagesTypeEnum);
    System.out.println("--------------");
    List<ImagesTypeEnum> imagesTypeEnumList = EnumUtils.getEnumList(ImagesTypeEnum.class);
    imagesTypeEnumList.stream().forEach(
            imagesTypeEnum1 -> System.out.println("imagesTypeEnum1 = " + imagesTypeEnum1)
    );
    System.out.println("--------------");
    Map<String, ImagesTypeEnum> imagesTypeEnumMap = EnumUtils.getEnumMap(ImagesTypeEnum.class);
    imagesTypeEnumMap.forEach((k, v) -> System.out.println("key:" + k + ",value:" + v));
    System.out.println("-------------");
    boolean result = EnumUtils.isValidEnum(ImagesTypeEnum.class, "JPG");
    System.out.println("result = " + result);
    boolean result1 = EnumUtils.isValidEnum(ImagesTypeEnum.class, null);
    System.out.println("result1 = " + result1);
}

输出结果:

imagesTypeEnum = JPG
--------------
imagesTypeEnum1 = JPG
imagesTypeEnum1 = JPEG
imagesTypeEnum1 = PNG
imagesTypeEnum1 = GIF
--------------
key:JPG,value:JPG
key:JPEG,value:JPEG
key:PNG,value:PNG
key:GIF,value:GIF
-------------
result = true
result1 = false

Process finished with exit code 0

collections4 集合操作

commons-collections4 增强了 Java 集合框架,提供了一系列简单的 API 方便操作集合。

maven 依赖

<dependency>  
    <groupId>org.apache.commons</groupId>  
    <artifactId>commons-collections4</artifactId>  
    <version>4.4</version>  
</dependency> 

CollectionUtils 工具类

这是一个工具类,可以检查 null 元素不被加入集合,合并列表,过滤列表,两个列表的并集、差集、合集。有部分功能在 Java 8 中可以被 Stream API 替换。

public static void main(String[] args) {

    //null 元素不能加进去
    List<String> arrayList1 = new ArrayList<>();
    arrayList1.add("a");
    CollectionUtils.addIgnoreNull(arrayList1, null);
    System.out.println(arrayList1.size());

    //排好序的集合,合并后还是排序的
    List<String> arrayList2 = new ArrayList<>();
    arrayList2.add("a");
    arrayList2.add("b");

    List<String> arrayList3 = new ArrayList<>();
    arrayList3.add("c");
    arrayList3.add("d");
    System.out.println("arrayList3:" + arrayList3);

    List<String> arrayList4 = CollectionUtils.collate(arrayList2, arrayList3);
    System.out.println("arrayList4:" + arrayList4);

    //交集
    Collection<String> strings = CollectionUtils.retainAll(arrayList4, arrayList3);
    System.out.println("arrayList3和arrayList4的交集:" + strings);

    //并集
    Collection<String> union = CollectionUtils.union(arrayList4, arrayList3);
    System.out.println("arrayList3和arrayList4的并集:" + union);

    //差集
    Collection<String> subtract = CollectionUtils.subtract(arrayList4, arrayList3);
    System.out.println("arrayList3和arrayList4的差集:" + subtract);

    // 过滤,只保留 b
    CollectionUtils.filter(arrayList4, s -> s.equals("b"));
    System.out.println(arrayList4);
}

输出结果:

1
arrayList3:[c, d]
arrayList4:[a, b, c, d]
arrayList3和arrayList4的交集:[c, d]
arrayList3和arrayList4的并集:[a, b, c, d]
arrayList3和arrayList4的差集:[a, b]
[b]

Process finished with exit code 0

Bag 统计次数

用于统计值在集合中出现的次数。

public static void main(String[] args) {
    Bag bag = new HashBag<String>();
    bag.add("a");
    bag.add("b");
    bag.add("a");
    bag.add("c", 3);
    System.out.println(bag);
    System.out.println(bag.getCount("c"));
}

输出结果:

[2:a,1:b,3:c]
3

Process finished with exit code 0

beanutils Bean 操作

beanutils 是通过反射机制对 JavaBean 进行操作的。比如对 Bean 进行复制、map 转对象、对象转 Map。

maven 依赖

<dependency>
    <groupId>commons-beanutils</groupId>
    <artifactId>commons-beanutils</artifactId>
    <version>1.9.4</version>
</dependency>

public class User {
    
    private String name;

    public String getName() {
        return name;
    }

    public void setName(String name) {
        this.name = name;
    }

}
public static void main(String[] args) throws Exception {
    User user1 = new User();
    user1.setName("李四");
    User user2 = (User) BeanUtils.cloneBean(user1);
    System.out.println(user2.getName());

    //User 转 map
    Map<String, String> describe = BeanUtils.describe(user1);
    System.out.println(describe);

    //Map 转 User
    Map<String, String> beanMap = new HashMap();
    beanMap.put("name", "张三");
    User user3 = new User();
    BeanUtils.populate(user3, beanMap);
    System.out.println(user3.getName());
}

输出结果:

李四
{name=李四}
张三

Process finished with exit code 0

Guava

Google 开源的一个基于 Java 扩展项目,包含了一些基本工具、集合扩展、缓存、并发工具包、字符串处理等。

maven 依赖

<dependency>
  <groupId>com.google.guava</groupId>
  <artifactId>guava</artifactId>
  <version>30.1.1-jre</version>
</dependency>

Map<String, List> 类型

在java 代码中经常会遇到需要写 Map<String, List> map 的局部变量的时候。有时候业务情况还会更复杂一点。

public static void main(String[] args) {
    //以前
    Map<String, List<String>> map = new HashMap<>();
    List<String> list = new ArrayList<>();
    list.add("张三");
    list.add("李四");
    map.put("名称", list);
    System.out.println(map.get("名称"));

    //现在
    Multimap<String, String> multimap = ArrayListMultimap.create();
    multimap.put("名称", "张三");
    multimap.put("名称", "李四");
    System.out.println(multimap.get("名称"));
}

输出结果:

[张三, 李四]
[张三, 李四]

Process finished with exit code 0

value 不能重复的 Map

在 Map 中 value 的值时可以重复的,Guava 可以创建一个 value 不可重复的 Map,并且 Map 和 value 可以对调。

public static void main(String[] args) {
    //会报异常
    BiMap<String ,String> biMap = HashBiMap.create();
    biMap.put("key1", "value");
    biMap.put("key2", "value");
    System.out.println(biMap.get("key1"));
}

输出结果:

Exception in thread "main" java.lang.IllegalArgumentException: value already present: value
    at com.google.common.collect.HashBiMap.put(HashBiMap.java:287)
    at com.google.common.collect.HashBiMap.put(HashBiMap.java:262)
    at org.example.clone.Test.main(Test.java:17)

Process finished with exit code 1
public static void main(String[] args) {
    BiMap<String ,String> biMap = HashBiMap.create();
    biMap.put("key1", "value1");
    biMap.put("key2", "value2");
    System.out.println(biMap.get("key1"));

    //key-value 对调
    biMap = biMap.inverse();
    System.out.println(biMap.get("value1"));
}

输出结果:

value1
key1

Process finished with exit code 0

Guava cache

写业务的时候肯定会使用缓存,当不想用第三方作为缓存的时候,Map 又不够强大,就可以使用 Guava 的缓存。

缓存的并发级别

Guava提供了设置并发级别的API,使得缓存支持并发的写入和读取。与ConcurrentHashMap类似,Guava cache的并发也是通过分离锁实现。在通常情况下,推荐将并发级别设置为服务器cpu核心数。

CacheBuilder.newBuilder()
        // 设置并发级别为cpu核心数,默认为4
        .concurrencyLevel(Runtime.getRuntime().availableProcessors()) 
        .build();

缓存的初始容量设置

我们在构建缓存时可以为缓存设置一个合理大小初始容量,由于Guava的缓存使用了分离锁的机制,扩容的代价非常昂贵。所以合理的初始容量能够减少缓存容器的扩容次数。

CacheBuilder.newBuilder()
        // 设置初始容量为100
        .initialCapacity(100)
        .build();

设置最大存储

Guava Cache可以在构建缓存对象时指定缓存所能够存储的最大记录数量。当Cache中的记录数量达到最大值后再调用put方法向其中添加对象,Guava会先从当前缓存的对象记录中选择一条删除掉,腾出空间后再将新的对象存储到Cache中。

public static void main(String[] args) {
    Cache<String, String> cache = CacheBuilder.newBuilder().maximumSize(2).build();
    cache.put("key1", "value1");
    cache.put("key2", "value2");
    cache.put("key3", "value3");
    System.out.println(cache.getIfPresent("key1")); //key1 = null
}

输出结果:

null

Process finished with exit code 0

过期时间

expireAfterAccess() 可以设置缓存的过期时间。

public static void main(String[] args) throws InterruptedException {
    //设置过期时间为2秒
    Cache<String, String> cache1 = CacheBuilder.newBuilder().maximumSize(2).expireAfterAccess(2, TimeUnit.SECONDS).build();
    cache1.put("key1", "value1");
    Thread.sleep(1000);
    System.out.println(cache1.getIfPresent("key1"));
    Thread.sleep(2000);
    System.out.println(cache1.getIfPresent("key1"));
}

输出结果:

value1
null

Process finished with exit code 0

LoadingCache

使用自定义ClassLoader加载数据,置入内存中。从LoadingCache中获取数据时,若数据存在则直接返回;若数据不存在,则根据ClassLoader的load方法加载数据至内存,然后返回该数据。

public class Test {

    public static void main(String[] args) throws Exception {
        System.out.println(numCache.get(1));
        Thread.sleep(1000);
        System.out.println(numCache.get(1));
        Thread.sleep(1000);
        numCache.put(1, 6);
        System.out.println(numCache.get(1));

    }

    private static LoadingCache<Integer, Integer> numCache = CacheBuilder.newBuilder().
            expireAfterWrite(5L, TimeUnit.MINUTES).
            maximumSize(5000L).
            build(new CacheLoader<Integer, Integer>() {
                @Override
                public Integer load(Integer key) throws Exception {
                    System.out.println("no cache");
                    return key * 5;
                }
            });
}

输出结果:

no cache
5
5
6

Process finished with exit code 0

总结

通过 Apache Commons 和 Guava 两个第三方的开源工具库,可以减少循环、ifelse 的代码。写出的代码更有健壮性并且可以在新人面前装一波。Apache Commons 和 Guava 有许许多多的工具类,这里只列出了小小的部分,可以在官网例子中查看到各种用法。

grep和sed查询某时间段内的日志

1、grep '2021-03-31 13:[3-4][0-9]' error.log -C10

这是查询13:30-13:49之间的日志

2、sed -n '/2021-03-31 13:[3-4][0-9]/p' error.log

这是查询13:30-13:49之间的日志

3、sed -n '/2021-03-31 13:[3-4][0-9]/,/2021-03-31 1[4-5]:[3-4][0-9]/p' error.log

查多个时间段的日志