axure 8.0授权码
用户名:aaa
注册码:2GQrt5XHYY7SBK/4b22Gm4Dh8alaR0/0k3gEN5h7FkVPIn8oG3uphlOeytIajxGU
用户名:aaa
注册码:2GQrt5XHYY7SBK/4b22Gm4Dh8alaR0/0k3gEN5h7FkVPIn8oG3uphlOeytIajxGU
更新了 Mac OS X 11后发现,不再能够通过Terminal用命令 cp 复制文件到 /usr/bin 了。
复制文件的时候出现权限问题:
cp: /usr/bin/mvim: Operation not permitted
搜索之后发现,是El Capitan 加入了Rootless机制,不再能够随心所欲的读写很多路径下了。设置 root 权限也不行。
Rootless机制将成为对抗恶意程序的最后防线
于是尝试关闭 Rootless。重启按住 Command+R,进入恢复模式,打开Terminal。
csrutil disable
重启即可。如果要恢复默认,那么
csrutil enable
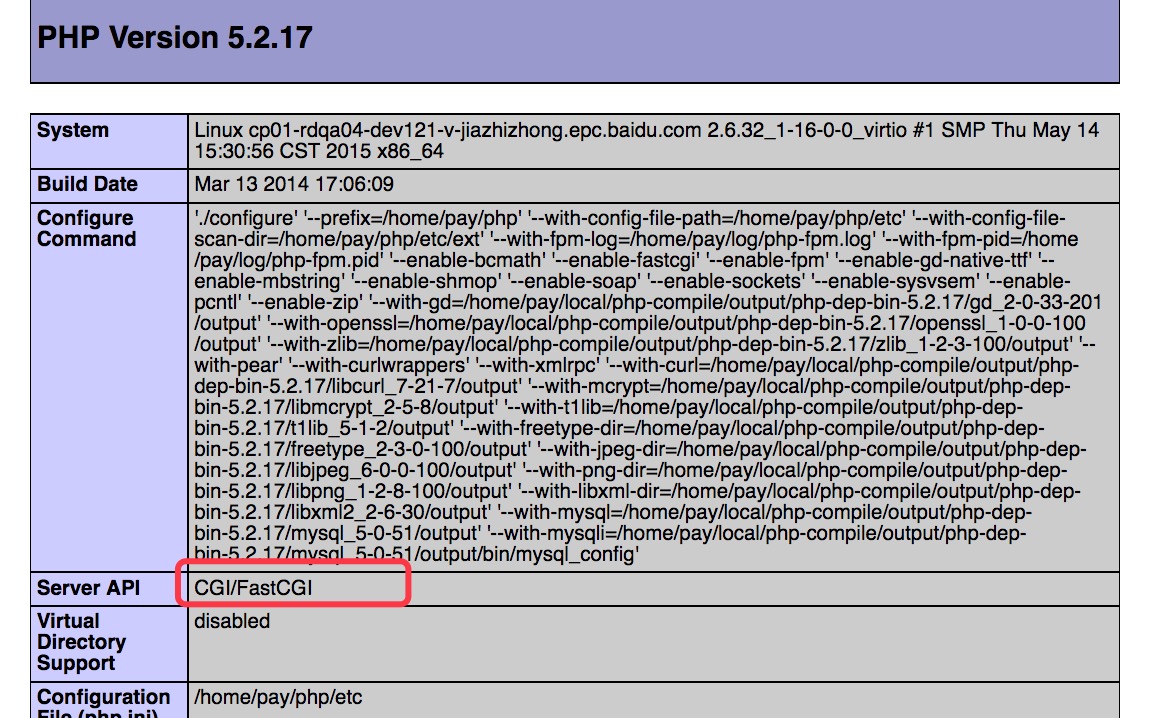
一,使用软件的详细版本信息如下:
http://www.linuxidc.com/Linux/2012-02/53418.htm
全部软件下载地址:http://yun.recallg.cn/s/ra8As549mQoJNMD
Apache/2.4.27
Apache FastCGI module(mod_fcgid/2.3.9)
PHP 5.2.17(php-cgi)
php各个版本下载地址:http://museum.php.net/php5/
二,详细的配置步骤:
1,安装mod_fcgid模块
1)Apache 模块下载地址:
http://httpd.apache.org/download.cgi#mod_fcgid
2)从源代码编译安装
[root@cp01-rdqa04-dev121-v-jiazhizhong.epc.baidu.com pay]# APXS=/opt/httpd/bin/apxs ./configure.apxs
[root@cp01-rdqa04-dev121-v-jiazhizhong.epc.baidu.com pay]# make && make install
3)修改apache的httpd.conf,加载mod_fcgid.so模块
LoadModule fcgid_module modules/mod_fcgid.so
4)在httpd.conf文件中添加mod_fcgid模块配置
<IfModule mod_fcgid.c>
    AddHandler fcgid-script .fcgi .php
    # Where to look for the php.ini file?
    FcgidInitialEnv PHPRC        "/home/users/test/php"
    # Set PHP_FCGI_MAX_REQUESTS to greater than or equal to FcgidMaxRequestsPerProcess
    # to prevent php-cgi process from exiting before all requests completed
    FcgidInitialEnv PHP_FCGI_MAX_REQUESTS      1000
    # Maximum requests a process should handle before it is terminated
    FcgidMaxRequestsPerProcess       1000
    # Maximum number of PHP processes
    FcgidMaxProcesses             15
    # Number of seconds of idle time before a php-cgi process is terminated
    FcgidIOTimeout             120
    FcgidIdleTimeout                120
    #Path to php-cgi
    FcgidWrapper "/home/users/v_jiazhizhong/php/bin/php-cgi" .php
    # Define the MIME-Type for ".php" files
    AddType application/x-httpd-php .php
</IfModule>
4)修改httpd.conf中的,添加在 Options Indexes FollowSymLinks后面添加Includes ExecCGI。修改后如下:
<Directory "/home/users/v_jiazhizhong/pay-finance-php/lib/index">
    #
    # Possible values for the Options directive are "None", "All",
    # or any combination of:
    #   Indexes Includes FollowSymLinks SymLinksifOwnerMatch ExecCGI MultiViews
    #
    # Note that "MultiViews" must be named *explicitly* --- "Options All"
    # doesn't give it to you.
    #
    # The Options directive is both complicated and important.  Please see
    # http://httpd.apache.org/docs/2.4/mod/core.html#options
    # for more information.

    Options Indexes FollowSymLinks MultiViews Includes ExecCGI
    AllowOverride None

    Order allow,deny
    Allow from all
    #
    # AllowOverride controls what directives may be placed in .htaccess files.
    # It can be "All", "None", or any combination of the keywords:
    #   AllowOverride FileInfo AuthConfig Limit
    #
    AllowOverride All

    #
    # Controls who can get stuff from this server.
    #
    Require all granted
</Directory>
5)配置好httpd.conf文件后保存,重启Apache,
1、用PHP打印出前一天的时间格式是2006-5-10 22:21:21
$a = date("Y-m-d H:i:s", strtotime("-1 day"));
print_r($a);
2、echo(),print(),print_r()的区别
echo 和print不是一个函数,是一个语言结构
int print(string $arg), 只有一个参数
echo arg1,arg1,arg2; 可以输出多个参数,返回void
echo和print只能打印出string,不能打印出结构
print_r能打印出结构
比如
$arr = array("key"=>"value");
print_r($arr);
3、能够使HTML和PHP分离开使用的模板引擎
smarty,phplib
4、使用哪些工具进行版本控制?
svn,git,cvs
5、如何实现字符串翻转?
#中文:GB2312, 代码是使用GB2312编码
<?php
function reverse($str)   {
    $ret = "";
    len=mbstrwidth(len=mbstrwidth(str,"GB2312");
    for(i=0;i=0;i< len;len;i++)
    {
        arr[]=mbsubstr(arr[]=mbsubstr(str, $i, 1, "GB2312");
    }
    return implode("", array_reverse($arr));
}
print_r(reverse("你好"));
6、优化MYSQL数据库的方法
语句方面:
1、使用索引,增加查询效率
2、优化查询语句,提高索引命中率

数据库涉及方面:
1、构造分库分表,提高数据库的存储和扩展能力
2、根据需要使用不同的存储引擎
7、PHP的意思
超级文本预处理语言
Hypertext PreProcessor
8、MYSQL取得当前时间的函数是?,格式化日期的函数是
CURRENT_TIMESTAMP()
DATE_FORMAT()
select DATE_FORMAT("2011-11-21 10:10:10", "%Y-%m-%d");
9、实现中文字串截取无乱码的方法。
mb_substr($str, 1, 1, "GB2312");
10、您是否用过版本控制软件? 如果有您用的版本控制软件的名字是
svn
git
11、您是否用过模板引擎? 如果有您用的模板引擎的名字是?
smarty
12、对于大流量的网站,您采用什么样的方法来解决访问量问题?
1、有效使用缓存,增加缓存命中率
2、使用负载均衡
3、对静态文件使用CDN进行存储和加速
4、想法减少数据库的使用
5、查看出现统计的瓶颈在哪里
13、用PHP写出显示客户端IP与服务器IP的代码
$_SERVER["REMOTE_ADDR"]
$_SERVER["SERVER_ADDR"]
14、语句include和require的区别是什么?为避免多次包含同一文件,可用(?)语句代替它们?
在失败的时候:
include产生一个warning,而require产生直接产生错误中断
require在运行前载入
include在运行时载入
require_once
include_once
15、如何修改SESSION的生存时间
session_set_cookie_params
16、有一个网页地址, 比如PHP研究室主页: http://www.phpv.net/index.html,如何得到它的内容?
file_get_contents
curl
17、在HTTP 1.0中,状态码401的含义是(?);如果返回“找不到文件”的提示,则可用 header 函数,其语句为
未授权
header("HTTP/1.0 404 Not Found");
fast CGI中:
header("Status: 404 Not Found");
18、在PHP中,heredoc是一种特殊的字符串,它的结束标志必须?
成对出现
$a = <<EOD
good test
EOD;
19、谈谈asp,php,jsp的优缺点
asp是需要依赖IIS,是微软开发的语言
php和jsp可以依赖apache或者 nginx等其他服务器
20、谈谈对mvc的认识
model : 数据结构层
view :展现
control : 接收和判断处理输入
21、写出发贴数最多的十个人名字的SQL,利用下表:members(id,username,posts,pass,email)
select top 10 id,username from members order by posts desc
22、请说明php中传值与传引用的区别。什么时候传值什么时候传引用?
&表示传引用
函数中参数传引用会将参数进行改变
一般在输出参数有多个的时候可以考虑使用引用
23. 在PHP中error_reporting这个函数有什么作用?
设定error的展示级别
24. 请写一个函数验证电子邮件的格式是否正确
$str = "jiazhizhong@126.com";
$regex="([a?z0?9\.?]+)@([\da?z\.?]+)\.([a?z\.]2,6)" ; //正则
preg_match($regex,$str,$matches);
return $matches;
25. 简述如何得到当前执行脚本路径,包括所得到参数。
$argc --获取参数数量
$argv --获取参数列表
26.如何修改SESSION的生存时间.
session_set_cookie_params
27、JS表单弹出对话框函数是?获得输入焦点函数是?
alert()
confirm()
promopt()
focus()
28、JS的转向函数是?怎么引入一个外部JS文件?
window.location.href="#"
<script src="#"></script>
29、foo()和@foo()之间有什么区别?
@代表所有warning忽略
30、如何声明一个名为”myclass”的没有方法和属性的类?
class myclass
{
}
31、如何实例化一个名为”myclass”的对象?
$myclass = new myclass();
32、你如何访问和设置一个类的属性?
<?php
class A
{
    public $name = "A";
}
$a = new A();
$n=$a->name;
print_r($n);
**33、mysql_fetch_row() 和mysql_fetch_array之间有什么区别? **
mysql_fetch_array() 是 mysql_fetch_row() 的扩展版本。除了将数据以数字索引方式储存在数组中之外,还可以将数据作为关联索引储存,用字段名作为键名。
<?php
mysql_connect("localhost", "mysql_user", "mysql_password") or
    die("Could not connect: " . mysql_error());
mysql_select_db("mydb");
$result = mysql_query("SELECT id, name FROM mytable");
while ($row=mysqlfetcharray($result, MYSQL_ASSOC)) {
    printf ("ID: %s  Name: %s", $row["id"],$row["id"],$row["name"]);
}
mysql_free_result($result);
34、GD库是做什么用的?
动态的开放的图片处理库
35、指出一些在PHP输入一段HTML代码的办法。
echo "{html}";
echo <<EOD
{html}
EOD;
36、下面哪个函数可以打开一个文件,以对文件进行读和写操作? 答案: C
(a) fget() (b) file_open() (c) fopen() (d) open_file()
37、下面哪个选项没有将 john 添加到users 数组中? 答案: B
(a) $users[] = ‘john’;
(b) array_add($users,’john’);
(c) array_push($users,‘john’);
(d) $users ||= ‘john’;
38、下面的程序会输出什么? 答案: 10
$num = 10;
function multiply(){
$num=$num * 10;
}
multiply();
echo $num;
?>
39、使用php写一段简单查询,查出所有姓名为“张三”的内容并打印出来。
表名 UserName Tel Content Date
张三 13333663366 大专毕业 2006-10-11
张三 13612312331 本科毕业 2006-10-15
张四 021-55665566 中专毕业 2006-10-15

请根据上面的题目完成代码:
$mysql_db=mysql_connect("local","root","pass");
@mysql_select_db("DB",$mysql_db);
$sql = sprintf("select * from %s where UserName = '%s'",
"表名",
"张三");
$values=mysqlquery($sql);
while($item=mysqlfetchqueryarray($values))
{
echo sprintf("用户名:%s, 电话 %s, 学历: %s, 毕业日期: %s",
item[′UserName′],item['Tel'], item[′Content′],item['Date']
);
}
40、如何使用下面的类,并解释下面什么意思?
class test{
    function Get_test($num){
$num=md5(md5($num)."En");
return $num;
}
}
$test = new test();
$ret = $test->Get_test(11);
print_r($ret);exit;
#将num进行MD5编码之后生成的32位字符串a1和"En"联系起来之后再进行一次MD5编码
41、写出 SQL语句的格式 : 插入 ,更新 ,删除
表名 UserName Tel Content Date
张三 13333663366 大专毕业 2006-10-11
张三 13612312331 本科毕业 2006-10-15
张四 021-55665566 中专毕业 2006-10-15

(a) 有一新记录(小王 13254748547 高中毕业 2007-05-06)请用SQL语句新增至表中

insert into 表名 values('小王', '13254748547', '高中毕业', '2007-05-06')

(b) 请用sql语句把张三的时间更新成为当前系统时间
update 表名 set Date = GETDATE() where UserName = "张三"

(c) 请写出删除名为张四的全部记录
delete from 表明 where UserName = "张四"
42、请写出数据类型(int char varchar datetime text)的意思; 请问varchar和char有什么区别
int 整型
char 存储定长
varchar 存储变长
datetime 时间
text 存储变长的
varchar是变长
char(20) 定长
43、MySQ自增类型(通常为表ID字段)必需将其设为(?)字段
auto_increment
44、写出以下程序的输出结果? 答案:4
$b=201;
$c=40;
$a=$b>$c ? 4 : 5;
echo $a;
?>
45、检测一个变量是否有设置的函数是否?是否为空的函数是?
isset()
empty()
46、取得查询结果集总数的函数是?
mysql_num_rows()
47、$arr = array('james', 'tom', 'symfony'); 请打印出第一个元素的值
print_r($arr[0]);
reset($arr);
print_r(current($arr));
print_r(array_shift($arr));
48、请将41题的数组的值用','号分隔并合并成字串输出
implode
49、$a=array('abcdef');请取出$a=array('abcdef');请取出$a的值并打印出第一个字母
$a[0];
substr($a, 0, 1);
50、PHP可以和sql server/oracle等数据库连接吗?
可以
有现成的库
51、请写出PHP5权限控制修饰符
public  (公共的)
private (私有的)
protected (受保护的)
52、请写出php5的构造函数和析构函数
public function __construct()   {
}
public function __destruct()   {
}
[编程题]
1、写一个函数,尽可能高效的,从一个标准 url 里取出文件的扩展名
例如: http://www.sina.com.cn/abc/de/fg.php?id=1 需要取出 php 或 .php
<?php
$url = "http://www.sina.com.cn/abc/de/fg.php?id=1";
$arr = parseurl($url);
$pathArr= pathinfo($arr['path']);
print_r($pathArr['extension']);
2. 写一个函数,算出两个文件的相对路径
如 $a = '/a/b/c/d/e.php';
$b = '/a/b/12/34/c.php';
计算出 b相对于b相对于a 的相对路径应该是 http://www.cnblogs.com/12/34/c.php将添上
<?php
$a = '/a/b/c/d/e.php';
$b = '/a/b/12/34/c.php';
//获取path相对于conpath的相对路径
function sGetRelativePath($path,$path,$conpath)   {
    $pathArr=explode("/",$path);
    $conpathArr=explode("/",$conpath);
    $dismatchlen = 0;
    for(i=0;i < count($pathArr);i++)
    {
        if($conpathArr[i] != $pathArr[i])
        {
            $dismatchlen=count($pathArr) - $i;
            $arrLeft=arrayslice($pathArr, $i);
            break;
        }
    }
    $ret=strrepeat("../",$dismatchlen).implode("/", $arrLeft);
    return $ret;
}
print_r(sGetRelativePath($b,$b,$a));
3、写一个函数,能够遍历一个文件夹下的所有文件和子文件夹。
<?php
function aGetAllFile($folder)   {
    $aFileArr = array();
    if(is_dir($folder))
    {
        $handle=opendir(#folder);
        while(($file=readdir($handle)) !== false)
        {
            //如果是.或者..则跳过
            if($file=="."||$file == "..")
            {
                continue;
            }
            if(is_file($folder."/".$folder."/".file))
            {
                $aFileArr[]=$file;
            }
            else if(is_dir($folder."/".$folder."/".file))
            {
                $aFileArr[$file] = aGetAllFile($folder."/".$folder."/".file);
            }
        }
        closedir($handle);
    }
    return $aFileArr;
}
$path = "/home/test/sql";
print_r(aGetAllFile($path));
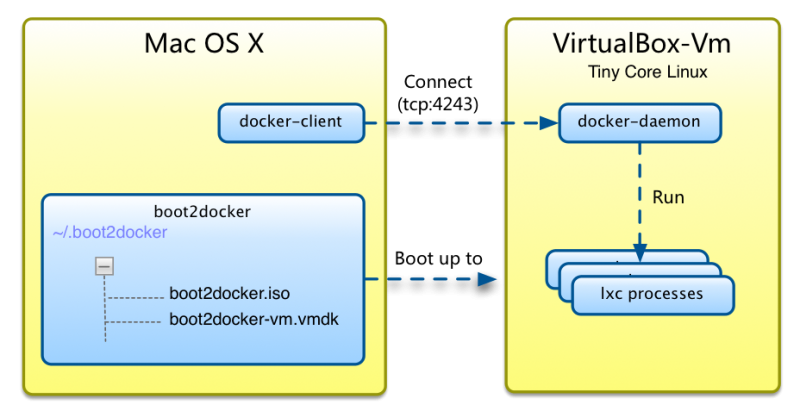
云主机可以选择操作系统镜像快速创建主机,这比虚拟机更便捷了,我们本地也可以这么做了,因为有了 Docker 这个东西。它依赖于 LXC(Linux Container),能从网络上获得配置好的 Linux 镜像,非常容易在隔离的系统中运行自己的应用。也因为它的底层核心是个 LXC,所以在 Mac OS X 下需要在 VirtualBox 中跑一个精小的 LXC(这里是一个 Tiny Core Linux,完全在内存中运行,个头只约 24MB,启动时间小于 5 秒的 boot2docker) 虚拟机,构建在 VirtualBox 中。以后的通信过程就是 docker --> boot2docker --> container,端口或磁盘映射也是遵照这一关系。
理解了上面的关系,开始说说 Docker 安装过程
1. 安装 VirtualBox, 不多讲, 因要在它当中创建一个 boot2docker-vm 虚拟机
2. 安装 boot2docker
brew install boot2docker
你也可以手工安装
curl https://raw.github.com/steeve/boot2docker/master/boot2docker > boot2docker; chmod +x boot2docker; sudo mv boot2docker /usr/local/bin
3. 安装 Docker
brew install docker
也可手工安装
curl -o docker http://get.docker.io/builds/Darwin/x86_64/docker-latest; chmod +x docker; sudo cp docker /usr/local/bin
4. 配置 Docker 客户端
export DOCKER_HOST=tcp://127.0.0.1:4243
把它写到 ~/.bash_profile 中,如果你是用的 bash 的话。我工作在 fish 下,所以在 ~/.config/fish/config.fish 中加了 set -x DOCKER_HOST tcp://127.0.0.1:4243
5. boot2docker 初始化与启动
boot2docker init
完成后就能在 VirtualBox 中看到一个叫做 boot2docker-vm的虚拟机,以后只需用 boot2docker 命令来控制这个虚拟机的行为,启动,停止等。
boot2docker up
启动,boot2docker-vm虚拟机,我们能在 VirtualBox 中看到该虚拟机变成 Running 状态
直接执行 boot2docker 可以看到可用的参数
Usage /usr/local/bin/boot2docker  {init|start|up|save|pause|stop|restart|status|info|delete|ssh|download}
6. 启动 Docker 守护进程
sudo docker -d
这时可执行
boot2docker ssh,输入密码  tcuser 进到该虚拟机的控制台下,如果要用户名的话请输入docker
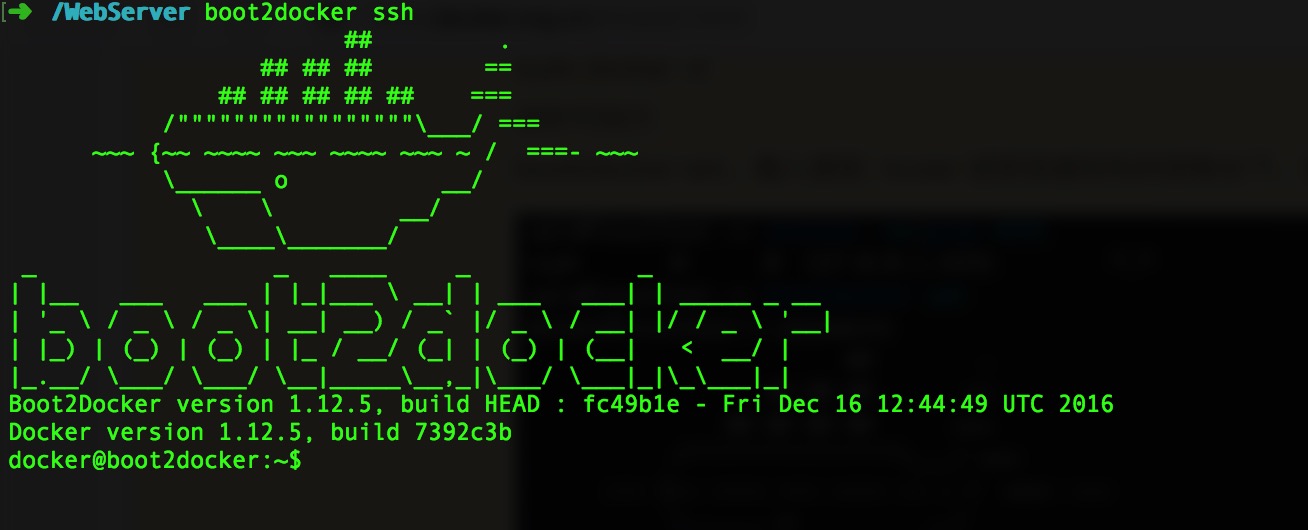
上面看到 Mac 启动了 4243 端口,在 boot2docker 虚拟机中也有 4243 端口,并在 /var/run/docker.sock 上监听。借此回顾下 docker 的通信过程,dock 命令是与 Docker daemon 在 Mac 上开启的 4243 端口通信,该端口映射到 boot2docker 的 4243 端口上,进而通过 /var/run/docker.sock 与其中的容器进行通信。
所以在执行 docker version 时如果没有启动 Docker daemon 会提示
2014/05/16 06:52:48 Cannot connect to the Docker daemon. Is 'docker -d' running on this host?
如果没有启动 boot2docker 会得到提示
Get http:///var/run/docker.sock/v1.11/version: dial unix /var/run/docker.sock: no such file or directory
Mac OS X -- boot2docker -- container 三者之间的关系,这张图很好的说明了
上面 boot2docker, docker 都准备就绪了, 现在开始进入 dock 的操作了,有关于 docker 的命令可以参看这里 http://blog.tankywoo.com/docker/2014/05/08/docker-4-summary.html。
1. 下载镜像,并加载启动容器
docker images    #现在没有一个镜像
docker pull ubuntu     #我们把这个拉下来试验,可用 docker search ubuntu 找到所有与 ubuntu 有关的镜像
docker run -i -t  ubuntu  #加载镜像 learn/tutorial 并进到 shell 下,这样就直接连接到该容器中,退出后容器也退了
docker ps     #在另一个终端中用这个命令,可以看到运行实例,即容器
现在我们在容器的控制台上 oot@95903c1a2bf7:/#,可以安装一个 apche2, curl 并启动 apache2,来测试下
root@d0889476e21e:/# apt-get update
root@d0889476e21e:/# apt-get install apache2 curl
root@d0889476e21e:/# apachectl start
root@d0889476e21e:/# curl http://localhost
<html><body><h1>It works!</h1>
Apache2 正常启动了,在容器内可访问。但现在还无法从 Mac OS X 上对该 apache 服务进行访问,这需要端口映射,有两种方式。不过在端口映射之前还需保存下镜像的修改。
2. 保存镜像
如果前面用 docker run -i -t learn/tutorial 运行的镜像
在运行该镜像的容器中安装了软件,需要把新的内容保存到该镜像中去,否则下次启动该镜像又恢复成原样
uqiu@localhost ~> docker ps -l
CONTAINER ID        IMAGE               COMMAND             CREATED             STATUS              PORTS                  NAMES
d0889476e21e        ubuntu        "/bin/bash"         About an hour ago   Up About an hour    0.0.0.0:8082->80/tcp   high_meitner
看到容器的 ID,然后执行
docker commit d0889476e21e ubuntu  #把当前容器的修改提交到镜像 ubuntu  中去
以后再次运行该镜像就有了最新安装的内容了。
3. 端口映射
比如我们现在要做的映射关系是 Mac OS X(9082) --> boot2docker(8082) --> container(80)
可以有两种办法
boot2docker ssh -L 9082:localhost:8082 #这条命令可以在 boot2docker-vm 运行时执行,建立多个不同的映射就是执行多次
docker run -i -t -p 8082:80 ubuntu
root@d0889476e21e:/# apachectl start
然后在 Mac 的浏览器中打开 http://localhost:9082
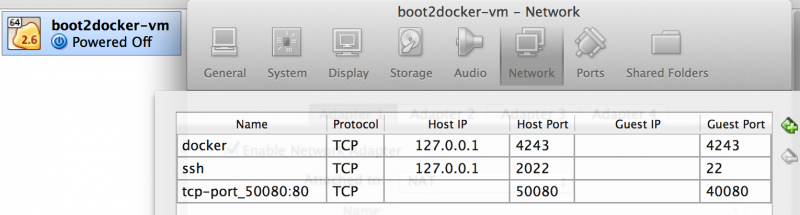
VBoxManage modifyvm "boot2docker-vm" --natpf1 "tcp-port_9082:80,tcp,,9082,,8082"
docker run -i -t -p 8082:80 ubuntu
root@c79b5070a972:/# apachectl start
这是直接修改了 boot2docker-vm 的配置,可以在 VirtualBox 中看到这条配置,配置 nat 命令见 http://www.virtualbox.org/manual/ch06.html#natforward. 也能建立许多的端口映射
4. Docker 容器镜像删除
1.停止所有的container,这样才能够删除其中的images:
docker stop $(docker ps -a -q)

如果想要删除所有container的话再加一个指令:
docker rm $(docker ps -a -q)

2.查看当前有些什么images
docker images

3.删除images,通过image的id来指定删除谁
docker rmi <image id>

想要删除untagged images,也就是那些id为<None>的image的话可以用
docker rmi $(docker images | grep "^<none>" | awk "{print $3}")

要删除全部image的话
docker rmi $(docker images -q)
Docker 的世界很精彩,其他内容基本就是怎么用好 Docker 命令,如管理镜像,容器,创建自己的镜像; Docker 有三种运行命令的方式,短暂方式,交互方式,daemon方式; 使用 ssh 来管理容器等等。
在 Mac 下使用 Docker 除了可用 boot2docker 作为 LXC,还有个替代品 VAGRANT 。
参考:
1. 利用Docker构建开发环境
2. Docker学习笔记之一,搭建一个JAVA Tomcat运行环境
3. Installing Docker on Mac OS X
4. https://github.com/boot2docker/boot2docker
5. Docker 快速入门