分类 linux服务器 下的文章

apache 通过mod_fcgi 模块加载php

一,使用软件的详细版本信息如下:
http://www.linuxidc.com/Linux/2012-02/53418.htm
全部软件下载地址:http://yun.recallg.cn/s/ra8As549mQoJNMD
Apache/2.4.27

Apache FastCGI module(mod_fcgid/2.3.9)

PHP 5.2.17(php-cgi)
php各个版本下载地址:http://museum.php.net/php5/

二,详细的配置步骤:

1,安装mod_fcgid模块

1)Apache 模块下载地址:
http://httpd.apache.org/download.cgi#mod_fcgid

2)从源代码编译安装

[root@cp01-rdqa04-dev121-v-jiazhizhong.epc.baidu.com pay]# APXS=/opt/httpd/bin/apxs ./configure.apxs
[root@cp01-rdqa04-dev121-v-jiazhizhong.epc.baidu.com pay]# make && make install

3)修改apache的httpd.conf,加载mod_fcgid.so模块

LoadModule fcgid_module modules/mod_fcgid.so

4)在httpd.conf文件中添加mod_fcgid模块配置

<IfModule mod_fcgid.c> 
    AddHandler fcgid-script .fcgi .php 
    # Where to look for the php.ini file? 
    FcgidInitialEnv PHPRC        "/home/users/test/php" 
    # Set PHP_FCGI_MAX_REQUESTS to greater than or equal to FcgidMaxRequestsPerProcess 
    # to prevent php-cgi process from exiting before all requests completed 
    FcgidInitialEnv PHP_FCGI_MAX_REQUESTS      1000 
    # Maximum requests a process should handle before it is terminated 
    FcgidMaxRequestsPerProcess       1000 
    # Maximum number of PHP processes 
    FcgidMaxProcesses             15 
    # Number of seconds of idle time before a php-cgi process is terminated 
    FcgidIOTimeout             120 
    FcgidIdleTimeout                120 
    #Path to php-cgi 
    FcgidWrapper "/home/users/v_jiazhizhong/php/bin/php-cgi" .php 
    # Define the MIME-Type for ".php" files 
    AddType application/x-httpd-php .php 
</IfModule> 

4)修改httpd.conf中的,添加在 Options Indexes FollowSymLinks后面添加Includes ExecCGI。修改后如下:

<Directory "/home/users/v_jiazhizhong/pay-finance-php/lib/index"> 
    # 
    # Possible values for the Options directive are "None", "All", 
    # or any combination of: 
    #   Indexes Includes FollowSymLinks SymLinksifOwnerMatch ExecCGI MultiViews 
    # 
    # Note that "MultiViews" must be named *explicitly* --- "Options All" 
    # doesn't give it to you. 
    # 
    # The Options directive is both complicated and important.  Please see 
    # http://httpd.apache.org/docs/2.4/mod/core.html#options 
    # for more information. 
 
    Options Indexes FollowSymLinks MultiViews Includes ExecCGI 
    AllowOverride None 

    Order allow,deny 
    Allow from all 
    # 
    # AllowOverride controls what directives may be placed in .htaccess files. 
    # It can be "All", "None", or any combination of the keywords: 
    #   AllowOverride FileInfo AuthConfig Limit 
    # 
    AllowOverride All 

    # 
    # Controls who can get stuff from this server. 
    # 
    Require all granted 
</Directory> 

5)配置好httpd.conf文件后保存,重启Apache,
phpinfo.jpg

Docker 安装及应用

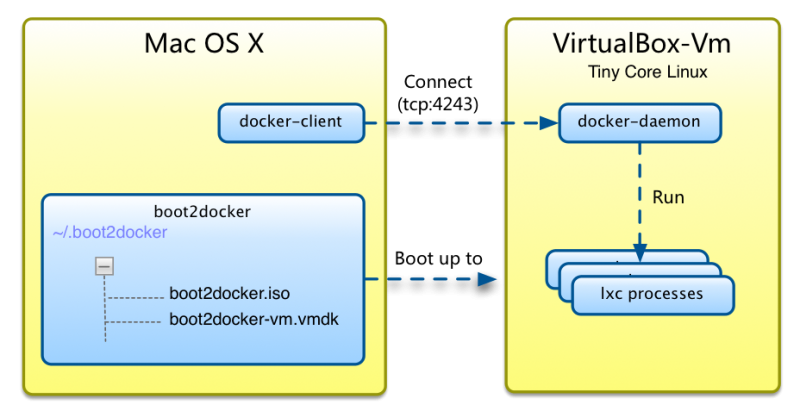
云主机可以选择操作系统镜像快速创建主机,这比虚拟机更便捷了,我们本地也可以这么做了,因为有了 Docker 这个东西。它依赖于 LXC(Linux Container),能从网络上获得配置好的 Linux 镜像,非常容易在隔离的系统中运行自己的应用。也因为它的底层核心是个 LXC,所以在 Mac OS X 下需要在 VirtualBox 中跑一个精小的 LXC(这里是一个 Tiny Core Linux,完全在内存中运行,个头只约 24MB,启动时间小于 5 秒的 boot2docker) 虚拟机,构建在 VirtualBox 中。以后的通信过程就是 docker --> boot2docker --> container,端口或磁盘映射也是遵照这一关系。

理解了上面的关系,开始说说 Docker 安装过程

1. 安装 VirtualBox, 不多讲, 因要在它当中创建一个 boot2docker-vm 虚拟机
2. 安装 boot2docker

brew install boot2docker
你也可以手工安装
curl https://raw.github.com/steeve/boot2docker/master/boot2docker > boot2docker; chmod +x boot2docker; sudo mv boot2docker /usr/local/bin

3. 安装 Docker

brew install docker
也可手工安装
curl -o docker http://get.docker.io/builds/Darwin/x86_64/docker-latest; chmod +x docker; sudo cp docker /usr/local/bin

4. 配置 Docker 客户端

export DOCKER_HOST=tcp://127.0.0.1:4243
把它写到 ~/.bash_profile 中,如果你是用的 bash 的话。我工作在 fish 下,所以在 ~/.config/fish/config.fish 中加了 set -x DOCKER_HOST tcp://127.0.0.1:4243

5. boot2docker 初始化与启动

boot2docker init
完成后就能在 VirtualBox 中看到一个叫做 boot2docker-vm的虚拟机,以后只需用 boot2docker 命令来控制这个虚拟机的行为,启动,停止等。
boot2docker up
启动,boot2docker-vm虚拟机,我们能在 VirtualBox 中看到该虚拟机变成 Running 状态
直接执行 boot2docker 可以看到可用的参数
Usage /usr/local/bin/boot2docker  {init|start|up|save|pause|stop|restart|status|info|delete|ssh|download}

6. 启动 Docker 守护进程

sudo docker -d
这时可执行
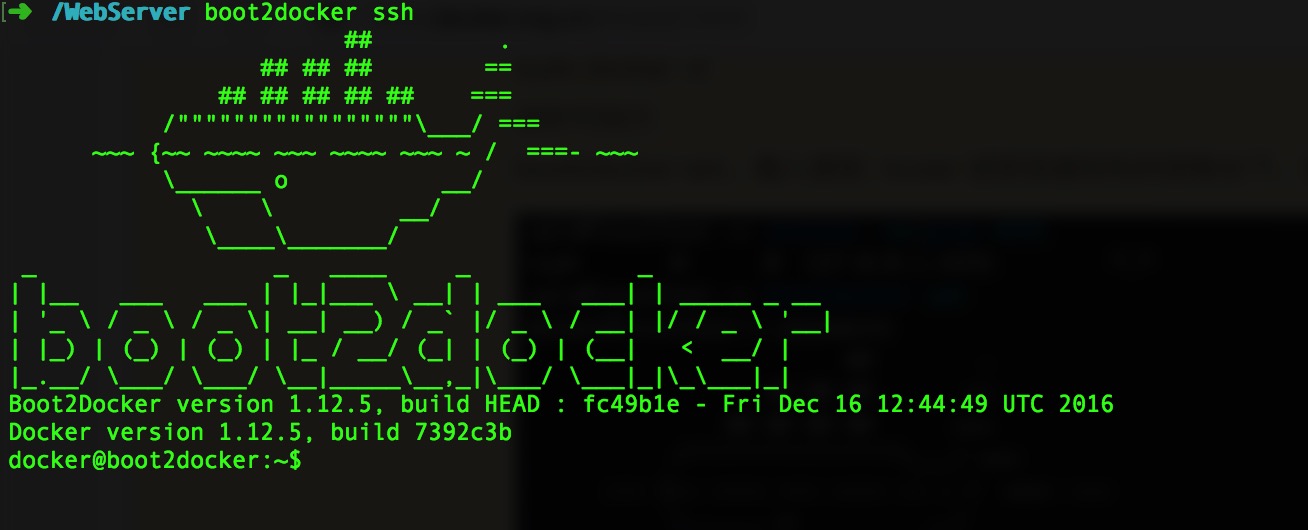
boot2docker ssh,输入密码  tcuser 进到该虚拟机的控制台下,如果要用户名的话请输入docker

test.jpg

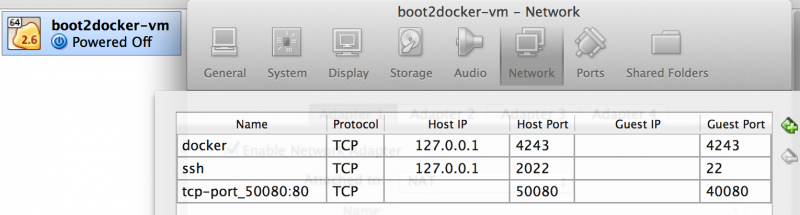
上面看到 Mac 启动了 4243 端口,在 boot2docker 虚拟机中也有 4243 端口,并在 /var/run/docker.sock 上监听。借此回顾下 docker 的通信过程,dock 命令是与 Docker daemon 在 Mac 上开启的 4243 端口通信,该端口映射到 boot2docker 的 4243 端口上,进而通过 /var/run/docker.sock 与其中的容器进行通信。
所以在执行 docker version 时如果没有启动 Docker daemon 会提示
2014/05/16 06:52:48 Cannot connect to the Docker daemon. Is 'docker -d' running on this host?
如果没有启动 boot2docker 会得到提示
Get http:///var/run/docker.sock/v1.11/version: dial unix /var/run/docker.sock: no such file or directory
Mac OS X -- boot2docker -- container 三者之间的关系,这张图很好的说明了
docker-install-800x417.png

上面 boot2docker, docker 都准备就绪了, 现在开始进入 dock 的操作了,有关于 docker 的命令可以参看这里 http://blog.tankywoo.com/docker/2014/05/08/docker-4-summary.html。


1. 下载镜像,并加载启动容器

docker images    #现在没有一个镜像
docker pull ubuntu     #我们把这个拉下来试验,可用 docker search ubuntu 找到所有与 ubuntu 有关的镜像
docker run -i -t  ubuntu  #加载镜像 learn/tutorial 并进到 shell 下,这样就直接连接到该容器中,退出后容器也退了
docker ps     #在另一个终端中用这个命令,可以看到运行实例,即容器
现在我们在容器的控制台上 oot@95903c1a2bf7:/#,可以安装一个 apche2, curl 并启动 apache2,来测试下
root@d0889476e21e:/# apt-get update
root@d0889476e21e:/# apt-get install apache2 curl
root@d0889476e21e:/# apachectl start
root@d0889476e21e:/# curl http://localhost
<html><body><h1>It works!</h1>

Apache2 正常启动了,在容器内可访问。但现在还无法从 Mac OS X 上对该 apache 服务进行访问,这需要端口映射,有两种方式。不过在端口映射之前还需保存下镜像的修改。

2. 保存镜像

如果前面用 docker run -i -t learn/tutorial 运行的镜像
在运行该镜像的容器中安装了软件,需要把新的内容保存到该镜像中去,否则下次启动该镜像又恢复成原样
uqiu@localhost ~> docker ps -l
CONTAINER ID        IMAGE               COMMAND             CREATED             STATUS              PORTS                  NAMES
d0889476e21e        ubuntu        "/bin/bash"         About an hour ago   Up About an hour    0.0.0.0:8082->80/tcp   high_meitner
看到容器的 ID,然后执行
docker commit d0889476e21e ubuntu  #把当前容器的修改提交到镜像 ubuntu  中去
以后再次运行该镜像就有了最新安装的内容了。

3. 端口映射
比如我们现在要做的映射关系是 Mac OS X(9082) --> boot2docker(8082) --> container(80)

可以有两种办法

boot2docker ssh -L 9082:localhost:8082 #这条命令可以在 boot2docker-vm 运行时执行,建立多个不同的映射就是执行多次
docker run -i -t -p 8082:80 ubuntu
root@d0889476e21e:/# apachectl start
然后在 Mac 的浏览器中打开 http://localhost:9082

VBoxManage modifyvm "boot2docker-vm" --natpf1 "tcp-port_9082:80,tcp,,9082,,8082"
docker run -i -t -p 8082:80 ubuntu
root@c79b5070a972:/# apachectl start
这是直接修改了 boot2docker-vm 的配置,可以在 VirtualBox 中看到这条配置,配置 nat 命令见 http://www.virtualbox.org/manual/ch06.html#natforward. 也能建立许多的端口映射
boot2docker-vm-port-800x215.png

4. Docker 容器镜像删除

1.停止所有的container,这样才能够删除其中的images:
docker stop $(docker ps -a -q)

如果想要删除所有container的话再加一个指令:
docker rm $(docker ps -a -q)

2.查看当前有些什么images
docker images

3.删除images,通过image的id来指定删除谁
docker rmi <image id>

想要删除untagged images,也就是那些id为<None>的image的话可以用
docker rmi $(docker images | grep "^<none>" | awk "{print $3}")

要删除全部image的话
docker rmi $(docker images -q)

Docker 的世界很精彩,其他内容基本就是怎么用好 Docker 命令,如管理镜像,容器,创建自己的镜像; Docker 有三种运行命令的方式,短暂方式,交互方式,daemon方式; 使用 ssh 来管理容器等等。
在 Mac 下使用 Docker 除了可用 boot2docker 作为 LXC,还有个替代品 VAGRANT 。
参考:
1. 利用Docker构建开发环境
2. Docker学习笔记之一,搭建一个JAVA Tomcat运行环境
3. Installing Docker on Mac OS X
4. https://github.com/boot2docker/boot2docker
5. Docker 快速入门

php 多线程扩展 pthreads 安装 及 使用

1、扩展的编译安装php(Linux),编辑参数 --enable-maintainer-zts 是必选项:
2、下载 php7:
http://tw2.php.net/get/php-7.1.2.tar.gz/from/a/mirrorduoxc

3、解压并编译php
tar -zxf php-7.1.2.tar.gz
cd php-7.1.2
./configure --prefix=/usr/local/php712 --with-config-file-path=/usr/local/php712/etc --with-config-file-scan-dir=/usr/local/php712/etc/php.d --with-mcrypt=/usr/include --enable-mysqlnd --with-mysqli --with-pdo-mysql --enable-fpm --with-gd --with-iconv --with-zlib --enable-xml --enable-shmop --enable-sysvsem --enable-inline-optimization --enable-mbregex --enable-mbstring --enable-ftp --enable-gd-native-ttf --enable-pcntl --enable-sockets --with-xmlrpc --enable-zip --enable-soap --without-pear --enable-session --with-curl --with-jpeg-dir --enable-sqlite-utf8 --enable-sysvmsg --enable-sysvshm --enable-wddx --with-xsl --enable-opcache --enable-maintainer-zts

sudo make -j8 && sudo make install

4、php编译完之后开始编译安装 pthreads扩展
5、下载pthreads扩展
https://github.com/krakjoe/pthreads
6、解压并安装
tar -zxf pthreads-3.1.6.tgz
cd pthreads-3.1.6
./configure --with-php-config=/usr/local/php712/bin/php-config
sudo make -j8 && sudo make install

7、配置php.ini
sudo vim /usr/local/php712/etc/php.ini
在 php.ini 最后添加:
[pthreads]
extension=pthreads.so

8、测试pthreads扩展
Thread.php :

<?php
Class Thread {

    public $hooks = array();
    public $args = array();

    public function thread() {

    }

    public function addthread($func) {
        $args = array_slice(func_get_args(), 1);
        $this->hooks[] = $func;
        $this->args[] = $args;
        return true;
    }

    public function runthread() {
        if(isset($_GET['flag'])) {
            $flag = intval($_GET['flag']);
        }

        if($flag || $flag === 0) {
            call_user_func_array($this->hooks[$flag], $this->args[$flag]);
        } else {
            for($i = 0, $size = count($this->hooks); $i < $size; $i++) {
                $fp=fsockopen($_SERVER['HTTP_HOST'],$_SERVER['SERVER_PORT']);

                if($fp) {
                    $out = "GET {$_SERVER['PHP_SELF']}?flag=$i HTTP/1.1rn";
                    $out .= "Host: {$_SERVER['HTTP_HOST']}rn";
                    $out .= "Connection: Closernrn";
                    fputs($fp,$out);
                    fclose($fp);
                }
            }
        }
    }
}

test.php :

include('Thread.php');
Class AsyncOperation extends Thread {

    public function __construct($arg){
        $this->arg = $arg;
    }

    public function run(){
        if($this->arg){
            printf("Hello %s\n", $this->arg);
        }
    }
}
$thread = new AsyncOperation("World");
if($thread->start()){
    $thread->join();
}

安装MySql 5.7 教程

1、下载MySQL安装包:

wget http://dev.mysql.com/get/Downloads/MySQL-5.7/mysql-5.7.17.tar.gz

2、安装依赖包:

MacOX: brew install cmake
       brew install boost
       brew install homebrew/dupes/ncurses
LINUX: yum -y install cmake  
       yum -y install bison  
       yum -y install ncurses-devel  

mysql5.7.1.jpg

mysql5.7.2.jpg

3、解压mysql安装包 并编译安装

#创建mysql用户以及相关目录
groupadd mysql              #所以在这里我们要建一个msyql的用户和组   
useradd -g mysql mysql -s /usr/sbin/nologin   
mkdir /usr/local/mysql5.7           #创建目录   
mkdir /usr/local/mysql5.7/data

$ tar -zxf mysql-5.7.17.tar.gz
$ cd mysql-5.7.17
$ cmake -DCMAKE_INSTALL_PREFIX=/usr/local/mysql5.7 -DDOWNLOAD_BOOST=1 -DWITH_BOOST=/usr/local/Cellar/boost/1.62.0 -DMYSQL_UNIX_ADDR=//usr/local/mysql5.7/data/mysql.sock -DMYSQL_USER=mysql -DEXTRA_CHARSETS=all -DDEFAULT_CHARSET=utf8 -DDEFAULT_COLLATION=utf8_general_ci -DWITH_MYISAM_STORAGE_ENGINE=1 -DWITH_INNOBASE_STORAGE_ENGINE=1 -DWITH_DEBUG=0 -DWITH_READLINE=1

#编译完成后开始安装
sudo make && make install 

4、安装成功后 配置MySQL
mysql5.7.3.jpg

#复制默认配置文件到 MySQL安装根目录下
sudo cp support-files/my-default.cnf /usr/local/mysql5.7/my.cnf
sudo vim /usr/local/mysql5.7/my.cnf

#配置文件内容
# For advice on how to change settings please see
# http://dev.mysql.com/doc/refman/5.7/en/server-configuration-defaults.html
# *** DO NOT EDIT THIS FILE. It's a template which will be copied to the
# *** default location during install, and will be replaced if you
# *** upgrade to a newer version of MySQL.

[mysqld]

# Remove leading # and set to the amount of RAM for the most important data
# cache in MySQL. Start at 70% of total RAM for dedicated server, else 10%.
# innodb_buffer_pool_size = 128M

# Remove leading # to turn on a very important data integrity option: logging
# changes to the binary log between backups.
# log_bin

# These are commonly set, remove the # and set as required.
basedir =/usr/local/mysql5.7/
datadir =/usr/local/mysql5.7/data
log-error =/usr/local/mysql5.7/log/mysql.err
pid-file =/usr/local/mysql5.7/mysql.pid
port =3309
#server_id = .....
socket =/usr/local/mysql5.7/data/mysql.sock

# Remove leading # to set options mainly useful for reporting servers.
# The server defaults are faster for transactions and fast SELECTs.
# Adjust sizes as needed, experiment to find the optimal values.
join_buffer_size = 128M
sort_buffer_size = 2M
read_rnd_buffer_size = 2M

sql_mode=NO_ENGINE_SUBSTITUTION,STRICT_TRANS_TABLES
#skip-grant-tables

#保存配置文件后 初始化数据库
bin/mysqld --initialize --basedir=/usr/local/mysql5.7/ --datadir=/usr/local/mysql5.7/data --user=_mysql

5、启动MySQL服务

sudo support-files/mysql.server start
如果启动报错 请修改 /usr/local/mysql5.7 根目录 /usr/local/mysql5.7/log 和 /usr/local/mysql5.7/data 文件夹权限 和 拥有者为 _mysql

6、修改默认密码

sudo vim my.cnf # 将其中的 skip-grant-tables 选项前 # 好去掉 保存并退出
sudo support-files/mysql.server restart 重启MySQL服务
#进入MySQL 
bin/mysql -uroot -p -P3309 -S/usr/local/mysql5.7/data/mysql.sock
#修改默认密码 并新建用户
UPDATE user SET authentication_string = password('123456') WHERE User = 'root';
flush privileges;
#新建用户
SET PASSWORD = PASSWORD('123456'); # root 用户密码
CREATE USER 'jiazhizhong'@'%' IDENTIFIED BY 'jia980709'; 
GRANT ALL ON *.* TO 'jiazhizhong'@'%';
flush privileges;
exit;
#重新启动MySQL服务
sudo support-files/mysql.server restart 

7、MySQL安装中遇到的错误 及 解决办法
7.1、遇到这个错误 是你没安装 boost 或没指定 boost 路径 (-DDOWNLOAD_BOOST=1 -DWITH_BOOST=/usr/local/Cellar/boost/1.62.0)
mysql5.7 安装.jpg

7.2、遇到下面这个错误是在 执行 mysql -uroot -p123456 命令或者是重启MySQL服务时遇到,将 my.cnf 文件中 socket 地址配置正确即可
    **Can’t connect to local MySQL server through socket ‘/tmp/mysql.sock**

7.3、这个错误是在命令行下登录进入MySQL后执行sql语句时报错,这个错误需要你执行 (SET PASSWORD = PASSWORD('123456'); # root 用户密码)这条sql 设定下root密码即可
    **ERROR 1820 (HY000): You must reset your password using ALTER USER statement before executing this statement.**

8、查看MySQL配置文件路径

#如果是linux系统,使用:

#第一种
sudo find / -name my.cnf
#第二种
sudo mysql --help | grep my.cnf

MYsql主从复制与同步

①主服务器配置:
打开MySQL配置文件my.cnf,在[mysqld]下面添加以下参数:

log-bin=mysql-bin //开启MYSQL二进制日志
server-id=1 //服务器ID不能重复
expire-logs-days = 7 //只保留7天的二进制日志,以防磁盘被日志占满

修改完配置文件后进入主数据库执行以下命令:

(1)、GRANT REPLICATION SLAVE ON *.* TO 'rep'@'192.168.1.3' IDENTIFIED BY '123';
(2)、show master status;

②从服务器配置:

打开MySQL配置文件my.cnf,修改在[mysqld]下面的参数:

将 server-id=1 改为 server-id=2

修改完配置文件后进入从数据库执行以下命令:

(1)、change master to master_host='192.168.86.128', master_user='reps', master_password='123', master_log_file='mysql-bin.000004', master_log_pos=563; 登录从库的MySQL
(2)、slave start; //启动从库连接
(3)、show slave status\G; //查看连接情况,是不是两个YES,两个YES为成功